RSS

Category Archives: API Management

3scale policy development – part 2 generate a policy scaffold

In first part of our multi-part blog series about 3scale policy development we looked into the setup of a development environment. Now we have a functioning development environment we can start the actual development of the 3scale policy. In this part we will take a look and use the scaffolding utility provided by APIcast to generate a policy scaffold.

The first thing we are going to do is create a new git branch of the APIcast source we have cloned in the previous part. This is an optional step, but developing a new feature or changing code in general in a new branch is a good habit to get into. So create a new branch and start up our development container.

$ git checkout -b policy-development-blog
Switched to a new branch 'policy-development-blog'
$ make development

To generate the scaffold of our policy we can use the apicast utility located in the bin/ directory of our development container.
So in the development container issue the following command:

$ bin/apicast generate policy hello_world

where hello_world is the name of the policy.

bash-4.2$ bin/apicast generate policy hello_world
source: /home/centos/examples/scaffold/policy
destination: /home/centos

exists: t
created: t/apicast-policy-hello_world.t
exists: gateway
exists: gateway/src
exists: gateway/src/apicast
exists: gateway/src/apicast/policy
created: gateway/src/apicast/policy/hello_world
created: gateway/src/apicast/policy/hello_world/hello_world.lua
created: gateway/src/apicast/policy/hello_world/init.lua
created: gateway/src/apicast/policy/hello_world/apicast-policy.json
exists: spec
exists: spec/policy
created: spec/policy/hello_world
created: spec/policy/hello_world/hello_world_spec.lua
bash-4.2$

As you can see from the output of the generate policy command a few files have been created. These artifacts related to our policy are located in three different directories:

  • t/ – this directory contains all Nginx integration tests
  • src/gateway/apicast/policy – this directory contains the source code and configuration schemas of all policies. Our policy resides in the subdirectory of hello_world
  • spec/policy – this directory contains the unit tests of all policies. The unit tests for our policy resides in the subdirectory of hello_world

So the policy scaffolding utility not only generates a scaffold for our policy, but also the files for a configuration schema, unit tests and integration tests. Let’s have a look at these files.

The source code of our policy residing in the directory src/gateway/apicast/policy/hello_world contains three files.

  • init.lua – all policies contain this init.lua file. It contains 1 line importing (require in Lua) our policy. It should not be modified.
  • aplicast-policy.json – The APIcast gateway is configured using a json document. Policies requiring configuration also use this json document. The apicast-policy.json file is a json schema file were configuration properties for the policy can be defined. We will look into configuration properties and this file in more detail in our next part of our policy development blog series.


{
  "$schema": "http://apicast.io/policy-v1/schema#manifest#",
  "name": "hello_world",
  "summary": "TODO: write policy summary",
  "description": [
      "TODO: Write policy description"
  ],
  "version": "builtin",
  "configuration": {
    "type": "object",
    "properties": { }
  }
}
  • hello_world.lua – This is the actual source code of our policy, which at the moment does not contain much.


-- This is a hello_world description.
local policy = require('apicast.policy')
local _M = policy.new('hello_world')
local new = _M.new
--- Initialize a hello_world
-- @tparam[opt] table config Policy configuration.
function _M.new(config)
  local self = new(config)
  return self
end
return _M

The first two lines import the APIcast policy module an instantiate a new policy with hello_world as an argument. This returns a module itself which is implemented using a Lua table. Lua is not an Object Oriented language from itself but tables (and especially metatables) can mimic objects. The third line stores a reference to a function new which is defined below. The new function takes a config variable as argument, but as of now nothing is done with is. The new method simply returns itself. Finally the module representing our policy is returned. This is done so other components importing this policy module retrieve the table and can invoke all functions and variables stored in the policy.
We won’t cover all the files in details here since we are going to touch these in upcoming series when we flesh out our policy with functionality.
But as a final verification to see if we have something working let’s run the unit tests again.

The keen observer can see the number of successes in the unit test outcome has increased from 749 to 751 after we generated the scaffold for our policy.

In the next part we will take a closer look at the json configuration schema file and how we can read the configuration values from the json configuration as well as ENV vars to use in our policy.

 
Leave a comment

Posted by on 2019-03-22 in API Management


Tags: , , , , , , ,

3scale policy development – part 1 setting up a development environment

3scale policy development – part 1 setting up a development environment

In this multi part blog series we are going to dive into the development, testing and deployment of a custom 3scale APIcast policy. In this initial part we are going to setup a development environment so we can actually start the development of our policy.

But before we begin, let’s first take a look what a 3scale APIcast policy is. We are not going into too much detail here, since better and more detailed descriptions about 3scale APIcast policies already exist.

For those unfamiliar 3scale is a full API Management solution of Red Hat. It exists of an API Manager used for account management, analytics and overall configuration. A developer portal used for outside developers for gaining access to API’s and viewing the documentation. And the API gateway named APIcast. The APIcast gateway is based on Nginx and more specifically Openresty, which is a distribution of Nginx compiled with various modules, most notable the lua-nginx-module.

The lua-nginx-module provides the ability to enhance a Nginx server by executing scripts using the Lua programming language. This is done by providing a Lua hook for each of the Nginx phases. Nginx works using an event loop and a state model where every request (as well as the starting of the server and its worker processes) goes through various phases. Each phase can execute a specific Lua function.

An overview of the various phases and corresponding Lua hooks was kindly in the README of the lua-nginx-module: https://github.com/openresty/lua-nginx-module#directives

Since the APIcast gateway uses Openresty 3scale provided a way to leverage these Lua hooks in the Nginx server using something called policies. As described in the APIcast README:

“The behaviour of APIcast is customizable via policies. A policy basically tells APIcast what it should do in each of the nginx phases.”

A detailed explanation of policies can be found in the same README: https://github.com/3scale/apicast/blob/master/doc/policies.md

Setting up the development enviroment

As was clear from the introduction, APIcast policies are created in the Lua programming language. So we need to setup an environment to do some Lua programming. Also, an actual APIcast server would be very nice to perform some local tests.

Luckily the guys from 3scale made it very easy to setup a development environment for APIcast using Docker and Docker Compose.

Pre-requisites:

This means both Docker and Docker compose must be installed.

The version of Docker I currently use is:

Docker version 18.09.2, build 6247962

Instructions for installing Docker can be found on the Docker website.

With Docker compose version:

docker-compose version 1.23.1, build b02f1306

Instructions for installing Docker-compose can also be found on the Docker website.

Setting up the APIcast development image:

Now that we have both Docker and Docker-compose installed we an setup the APIcast development image.

Firstly the APIcast git repostitory must be cloned so we can start the development of our policy. Since we are going to base our policy on the latest 3scale release we are switching to the stable branch of APIcast.

$ git clone https://github.com/3scale/apicast.git

when done switch to a stable branch, I am using 3.3

$ cd apicast/

$ git checkout 3.3-stable

To start the APIcast containers using Docker-compose we can use the Make file provided by 3scale. In the APIcast directory simply execute the command:

$ make development

The Docker container starts in the foreground with a bash session. The first thing we need to do inside the container is installing all the dependencies.

This can also be done using a Make command, which again must be issued inside the container.

$ make dependencies

It will now download and install a plethora of dependencies inside the container.

The output will be very long, but if everything went well you should be greeted with an output that looks something like this:

Now as a final verification we can run some APIcast unit tests to see if we are up and running and ready to start the development of our policy.

To run the Lua unit tests run the following command inside the container:

$ make busted

Now that we can successfully run unit tests we can start our policy development!

The project’s source code will be available in the container and sync’ed with your local apicast directory, so you can edit files in your preferred environment and still be able to run whatever you need inside the Docker container.

The development container for APIcast uses a Docker volume mount to mount the local apicast directory inside the container. This means all files changed locally in the repository are synced with the container and used in the tests and runtime of the development container.

It also means you can use your favorite IDE or editor develop your 3scale policy.

Optional setup an IDE for policy development:

The use of an IDE or text editor and more specifically which one is very personal so there is definitely no one size fits all here. But for those looking for a dedicated Lua IDE ZeroBraneStudio is a good choice.

Since I come from a Java background I am very used to working with IntelliJ IDEA, and luckily there are some plugins available that make Lua development a little bit nicer.

These are the plugins I installed for developing Lua code and 3scale policies in particular:

And for Openresty/Nginx there is also a plugin:

As a final step, but this is more relevant if you are also planning on developing some Openresty based applications locally (outside the APIcast development container), you can install Openresty, based on the instructions on their website.

What I did was I linked the Lua runtime engine of Openresty, which is LuaJIT, to the SDK of my IntelliJ IDEA so that I am developing code against the LuaJIT engine of Openresty.

As I already mentioned these steps are not required for developing policies in APIcast, and you definitely do not need to use IntelliJ IDEA. But having a good IDE or Text editor, whatever your choice, can make your development life a little bit easier.

Now we are ready to create a 3scale APIcast policy, which is the subject of the next part!

 
Leave a comment

Posted by on 2019-03-01 in API Management


Tags: , , , , , , ,

Authenticating a JMS consumer with 3Scale, Camel and ActiveMQ

3Scale is an API Management platform used for authenticating an throttleing API calls among many, many other things. Now when thinking of API’s most people think of RESTfull API’s these days. And altough 3Scale primarily targets RESTfull API’s it is also possible to use other types of API’s as this blog will demonstrate. In this post we will use a Camel JMS subscriber in combination with ActiveMQ and authenticate requests against the 3Scale API Management platform.

First let’s look at the 3Scale setup.

The first step is to create a new service, however normally one would select one of the APICast API Gateway options for handling the API traffic. This time however we are selecting the Java plugin option, since Camel is based on Java. Obviously the same principles could be applied in one of the other programming languages for which plugins are available.   

The next step is to go to the integration page. But, where normally we would configure the mapping rules of our RESTfull API, we now get instructions to implement the Java plugin.


It is good to note the rest of the 3Scale setup is completely default. De default Hits metric is used as shown below, although custom methods could easily be defined.


For this example one application plan with a rate limit has been configured.

Integrating the 3Scale Java plugin with Apache Camel

Apache Camel has numerous ways of integrating custom code and creating customizations. For this example a custom processor is created, although a bean, or component would work also.

The first step is to import the 3Scale java plugin dependency via Maven, by adding the following to the pom.xml file:


<dependency>
    <groupId>net.3scale</groupId>
    <artifactId>3scale-api</artifactId>
    <version>3.0.4</version>
</dependency>

Now we can integrate the 3Scale Java plugin in our Camel processor, which is going to retrieve the 3Scale appId and appKey, used for authentication from JMS headers. With the appId and appKey the 3Scale API is called for authentication. However this is not the only thing we need to pass in our request towards 3Scale. To authenticate against 3Scale selecting the correct 3Scale account and service we need to pass the ServiceId of the service we created above and pass the accompanying service token. Since these are fixed per environment we retrieve these values from a properties file. Finally we need to increment the hits metric. Once all these parameters are passed in the request we can invoke 3Scale and authenticate our request. If we are authenticated and authorized for this API we finish the processor, following the Camel Route execution. However, when we are not authenticated we are going to stop the route and any further processing.
The entire processor looks like this:

package nl.rubix.eos.api.camelthreescale.processor;

import org.apache.camel.Exchange;
import org.apache.camel.Processor;
import org.apache.camel.RuntimeCamelException;
import org.apache.deltaspike.core.api.config.ConfigProperty;
import threescale.v3.api.AuthorizeResponse;
import threescale.v3.api.ParameterMap;
import threescale.v3.api.ServerError;
import threescale.v3.api.ServiceApi;
import threescale.v3.api.impl.ServiceApiDriver;

import javax.inject.Inject;
import javax.inject.Named;

@Named("authRepProcessor")
public class AuthRepProcessor implements Processor {

  @Inject
  @ConfigProperty(name = "SERVICE_TOKEN")
  private String serviceToken;

  @Inject
  @ConfigProperty(name = "SERVICE_ID")
  private String serviceId;

  @Override
  public void process(Exchange exchange) throws Exception {
    String appId = exchange.getIn().getHeader("appId", String.class);
    String appKey = exchange.getIn().getHeader("appKey", String.class);

    AuthorizeResponse authzResponse = authrep(createParametersMap(appId, appKey));

    if(authzResponse.success() == false) {
      exchange.setProperty(Exchange.ROUTE_STOP, true);
      exchange.getIn().setHeader("authz:errorCode", authzResponse.getErrorCode());
      exchange.getIn().setHeader("authz:reason", authzResponse.getReason());
    }

  }

  private ParameterMap createParametersMap(String appId, String appKey) {
    ParameterMap params = new ParameterMap();
    params.add("app_id", appId);
    params.add("app_key", appKey);

    ParameterMap usage = new ParameterMap();
    usage.add("hits", "1");
    params.add("usage", usage);

    return params;
  }

  private AuthorizeResponse authrep(ParameterMap params) {

    ServiceApi serviceApi = ServiceApiDriver.createApi();

    AuthorizeResponse response = null;

    try {
      response = serviceApi.authrep(serviceToken, serviceId, params);
    } catch (ServerError serverError) {
      serverError.printStackTrace();
      throw new RuntimeCamelException(serverError.getMessage(), serverError.getCause());
    }
    return response;
  }
}

We simply use this processor in our Camel route to add the 3Scale functionality:

package nl.rubix.eos.api.camelthreescale;

import io.fabric8.annotations.Alias;
import org.apache.activemq.camel.component.ActiveMQComponent;
import org.apache.camel.builder.RouteBuilder;
import org.apache.camel.cdi.ContextName;

import javax.inject.Inject;

@ContextName("activemq-camel-api")
public class ActiveMqCamelApi extends RouteBuilder{

  @Inject
  @Alias("jms")
  private ActiveMQComponent activeMQComponent;

  @Override
  public void configure() throws Exception {
      from("jms:queue:test")
        .log("received message")
        .process("authRepProcessor")
        .log("request authenticated and authorized");
  }
}

When looking at the logs we can see the request is authenticated when we send a request with the correct appId and appKey in the JMS headers. When looking at the logs we can see the request is passing the processor:

2018-03-10 20:28:40,294 [cdi.Main.main()] INFO  DefaultCamelContext            - Route: route1 started and consuming from: Endpoint[jms://queue:test]
2018-03-10 20:28:40,295 [cdi.Main.main()] INFO  DefaultCamelContext            - Total 1 routes, of which 1 are started.
2018-03-10 20:28:40,295 [cdi.Main.main()] INFO  DefaultCamelContext            - Apache Camel 2.17.0.redhat-630187 (CamelContext: activemq-camel-api) started in 0.512 seconds
2018-03-10 20:28:40,318 [cdi.Main.main()] INFO  Bootstrap                      - WELD-ENV-002003: Weld SE container STATIC_INSTANCE initialized
2018-03-10 20:29:37,157 [sConsumer[test]] INFO  route1                         - received message
2018-03-10 20:29:38,307 [sConsumer[test]] INFO  route1                         - request authenticated and authorized

And off course we can see the metrics in 3Scale:

Now this processor discards the message when the authentication by 3Scale fails, but it is off course possible to send the unauthorized messages towards a special error queue, or make the entire route transactional and simply do not send an ACK when authentication fails.

The entire code of this example is available on Github.

 
Leave a comment

Posted by on 2018-03-10 in API Management


Tags: , , ,

Camel CDI app in Fabric8 via Maven

Recently I spent some time experimenting with the Fabric8 microservices framework. And while it is way too comprehensive to cover in a single blog post I wanted to focus on deploying an App/Microservice to a Fabric8 cluster.

For this post I am using a local fabric8 install using minikube, for more information see: http://fabric8.io/guide/getStarted/gofabric8.html

For details on to setup your fabric8 environment using minikube you can read the excellent blog post of my collegue Dirk Janssen here.

Also since I am doing quite a lot of work recently with Apache Camel using the CDI framework I the decision to deploy a Camel CDI based microservice was quickly made 🙂

So in this blog I will outline how to create a basic Camel/CDI based microservice using maven and deploy in on a kubernetes cluster using a fabric8 CD pipeline.

Generating the microservice

I used a maven archetype to quickly bootstrap the microservice. Now I used the Eclipse IDE to generate the project, but you can off course use the Maven CLI as well.

archetype-selector

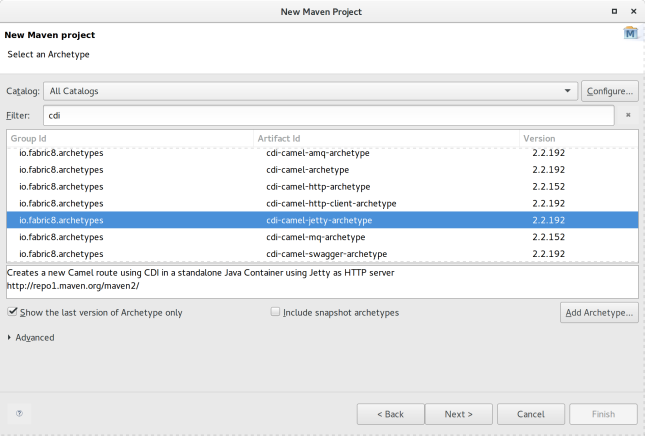
Fabric8 provides lots of different archetypes and quickstarts out of the box for various types of programming languages and especially for Java various frameworks. Here I am going with the cdi-camel-jetty-archetype. This archetype generates a Camel route exposed with a Jetty endpoint wired together using CDI.


Building and running locally

As with any Maven based application one of the first things to do after the project is created is executing:

$ mvn clean install

However initially the result was:


~/workspace/cdi-jetty-demo$ mvn install
[INFO] Scanning for projects...
[INFO]
[INFO] ------------------------------------------------------------------------
[INFO] Building Fabric8 :: Quickstarts :: CDI :: Camel with Jetty as HTTP server 0.0.1-SNAPSHOT
[INFO] ------------------------------------------------------------------------
[INFO]
[INFO] --- maven-resources-plugin:2.6:resources (default-resources) @ cdi-jetty-demo ---
[INFO] Using 'UTF-8' encoding to copy filtered resources.
[INFO] Copying 2 resources
[INFO]
[INFO] --- fabric8-maven-plugin:3.2.8:resource (default) @ cdi-jetty-demo ---
[INFO] F8: Running in Kubernetes mode
[INFO] F8: Using resource templates from /home/pim/workspace/cdi-jetty-demo/src/main/fabric8
2016-12-28 11:54:14 INFO  Version:30 - HV000001: Hibernate Validator 5.2.4.Final
[WARNING] F8: fmp-git: No .git/config file could be found so cannot annotate kubernetes resources with git commit SHA and branch
[WARNING] F8: fmp-git: No .git/config file could be found so cannot annotate kubernetes resources with git commit SHA and branch
[WARNING] F8: fmp-git: No .git/config file could be found so cannot annotate kubernetes resources with git commit SHA and branch
[WARNING] F8: fmp-git: No .git/config file could be found so cannot annotate kubernetes resources with git commit SHA and branch
[WARNING] F8: fmp-git: No .git/config file could be found so cannot annotate kubernetes resources with git commit SHA and branch
[WARNING] F8: fmp-git: No .git/config file could be found so cannot annotate kubernetes resources with git commit SHA and branch
[INFO] ------------------------------------------------------------------------
[INFO] BUILD FAILURE
[INFO] ------------------------------------------------------------------------
[INFO] Total time: 3.612 s
[INFO] Finished at: 2016-12-28T11:54:14+01:00
[INFO] Final Memory: 37M/533M
[INFO] ------------------------------------------------------------------------
[ERROR] Failed to execute goal io.fabric8:fabric8-maven-plugin:3.2.8:resource (default) on project cdi-jetty-demo: Execution default of goal io.fabric8:fabric8-maven-plugin:3.2.8:resource failed: Container cdi-jetty-demo has no Docker image configured. Please check your Docker image configuration (including the generators which are supposed to run) -> [Help 1]
[ERROR]
[ERROR] To see the full stack trace of the errors, re-run Maven with the -e switch.
[ERROR] Re-run Maven using the -X switch to enable full debug logging.
[ERROR]
[ERROR] For more information about the errors and possible solutions, please read the following articles:
[ERROR] [Help 1] http://cwiki.apache.org/confluence/display/MAVEN/PluginExecutionException

Since the archetype did not have a template in cdi-jetty-demo/src/main/fabric8 and was still looking for it there it was throwing an error. After some looking around I managed to solve the issue by using a different version of the fabric8-maven-plugin.

Specifically:

<fabric8.maven.plugin.version>3.1.49</fabric8.maven.plugin.version>

Now running the clean install was executing successfully.


~/workspace/cdi-jetty-demo$ mvn clean install
[INFO] Scanning for projects...
[INFO]
[INFO] ------------------------------------------------------------------------
[INFO] Building Fabric8 :: Quickstarts :: CDI :: Camel with Jetty as HTTP server 0.0.1-SNAPSHOT
[INFO] ------------------------------------------------------------------------
[INFO]
[INFO] --- maven-clean-plugin:2.5:clean (default-clean) @ cdi-jetty-demo ---
[INFO] Deleting /home/pim/workspace/cdi-jetty-demo/target
[INFO]
[INFO] --- maven-resources-plugin:2.6:resources (default-resources) @ cdi-jetty-demo ---
[INFO] Using 'UTF-8' encoding to copy filtered resources.
[INFO] Copying 2 resources
[INFO]
[INFO] --- fabric8-maven-plugin:3.1.49:resource (default) @ cdi-jetty-demo ---
[INFO] F8> Running in Kubernetes mode
[INFO] F8> Running generator java-exec
[INFO] F8> Using resource templates from /home/pim/workspace/cdi-jetty-demo/src/main/fabric8
[WARNING] F8> No .git/config file could be found so cannot annotate kubernetes resources with git commit SHA and branch
[WARNING] F8> No .git/config file could be found so cannot annotate kubernetes resources with git commit SHA and branch
[INFO]
[INFO] --- maven-compiler-plugin:3.3:compile (default-compile) @ cdi-jetty-demo ---
[INFO] Changes detected - recompiling the module!
[INFO] Compiling 1 source file to /home/pim/workspace/cdi-jetty-demo/target/classes
[INFO]
[INFO] --- maven-resources-plugin:2.6:testResources (default-testResources) @ cdi-jetty-demo ---
[INFO] Using 'UTF-8' encoding to copy filtered resources.
[INFO] Copying 1 resource
[INFO]
[INFO] --- maven-compiler-plugin:3.3:testCompile (default-testCompile) @ cdi-jetty-demo ---
[INFO] Changes detected - recompiling the module!
[INFO] Compiling 1 source file to /home/pim/workspace/cdi-jetty-demo/target/test-classes
[INFO]
[INFO] --- maven-surefire-plugin:2.18.1:test (default-test) @ cdi-jetty-demo ---
[INFO]
[INFO] --- maven-jar-plugin:2.4:jar (default-jar) @ cdi-jetty-demo ---
[INFO] Building jar: /home/pim/workspace/cdi-jetty-demo/target/cdi-jetty-demo.jar
[INFO]
[INFO] >>> fabric8-maven-plugin:3.1.49:build (default) > initialize @ cdi-jetty-demo >>>
[INFO]
[INFO] <<< fabric8-maven-plugin:3.1.49:build (default) < initialize @ cdi-jetty-demo <<<
[INFO]
[INFO] --- fabric8-maven-plugin:3.1.49:build (default) @ cdi-jetty-demo ---
[INFO] F8> Running in Kubernetes mode
[INFO] F8> Running generator java-exec
[INFO] F8> Environment variable from gofabric8 : DOCKER_HOST=tcp://192.168.42.40:2376
[INFO] F8> Environment variable from gofabric8 : DOCKER_CERT_PATH=/home/pim/.minikube/certs
[INFO] F8> Pulling from fabric8/java-alpine-openjdk8-jdk
117f30b7ae3d: Already exists
f1011be98339: Pull complete
dae2abad9134: Pull complete
d1ea5cd75444: Pull complete
cec1e2f1c0f2: Pull complete
a9ec98a3bcba: Pull complete
38bbb9125eaa: Pull complete
66f50c07037b: Pull complete
868f8ddb8412: Pull complete
[INFO] F8> Digest: sha256:572ec2fdc9ac33bb1a8a5ee96c17eae9b7797666ed038c08b5c3583f98c1277f
[INFO] F8> Status: Downloaded newer image for fabric8/java-alpine-openjdk8-jdk:1.1.11
[INFO] F8> Pulled fabric8/java-alpine-openjdk8-jdk:1.1.11 in 47 seconds
Downloading: https://repo.fusesource.com/nexus/content/groups/public/org/apache/httpcomponents/httpclient/4.3.3/httpclient-4.3.3.pom
Downloading: https://maven.repository.redhat.com/ga/org/apache/httpcomponents/httpclient/4.3.3/httpclient-4.3.3.pom
Downloading: https://repo.maven.apache.org/maven2/org/apache/httpcomponents/httpclient/4.3.3/httpclient-4.3.3.pom
Downloaded: https://repo.maven.apache.org/maven2/org/apache/httpcomponents/httpclient/4.3.3/httpclient-4.3.3.pom (6 KB at 30.9 KB/sec)
Downloading: https://repo.fusesource.com/nexus/content/groups/public/org/apache/httpcomponents/httpmime/4.3.3/httpmime-4.3.3.pom
Downloading: https://maven.repository.redhat.com/ga/org/apache/httpcomponents/httpmime/4.3.3/httpmime-4.3.3.pom
Downloading: https://repo.maven.apache.org/maven2/org/apache/httpcomponents/httpmime/4.3.3/httpmime-4.3.3.pom
Downloaded: https://repo.maven.apache.org/maven2/org/apache/httpcomponents/httpmime/4.3.3/httpmime-4.3.3.pom (5 KB at 81.7 KB/sec)
Downloading: https://repo.fusesource.com/nexus/content/groups/public/org/apache/httpcomponents/httpclient-cache/4.3.3/httpclient-cache-4.3.3.pom
Downloading: https://maven.repository.redhat.com/ga/org/apache/httpcomponents/httpclient-cache/4.3.3/httpclient-cache-4.3.3.pom
Downloading: https://repo.maven.apache.org/maven2/org/apache/httpcomponents/httpclient-cache/4.3.3/httpclient-cache-4.3.3.pom
Downloaded: https://repo.maven.apache.org/maven2/org/apache/httpcomponents/httpclient-cache/4.3.3/httpclient-cache-4.3.3.pom (7 KB at 102.3 KB/sec)
Downloading: https://repo.fusesource.com/nexus/content/groups/public/org/apache/httpcomponents/fluent-hc/4.3.3/fluent-hc-4.3.3.pom
Downloading: https://maven.repository.redhat.com/ga/org/apache/httpcomponents/fluent-hc/4.3.3/fluent-hc-4.3.3.pom
Downloading: https://repo.maven.apache.org/maven2/org/apache/httpcomponents/fluent-hc/4.3.3/fluent-hc-4.3.3.pom
Downloaded: https://repo.maven.apache.org/maven2/org/apache/httpcomponents/fluent-hc/4.3.3/fluent-hc-4.3.3.pom (5 KB at 80.4 KB/sec)
[INFO] Copying files to /home/pim/workspace/cdi-jetty-demo/target/docker/eos/cdi-jetty-demo/snapshot-161228-115614-0167/build/maven
[INFO] Building tar: /home/pim/workspace/cdi-jetty-demo/target/docker/eos/cdi-jetty-demo/snapshot-161228-115614-0167/tmp/docker-build.tar
[INFO] F8> docker-build.tar: Created [eos/cdi-jetty-demo:snapshot-161228-115614-0167] "java-exec" in 8 seconds
[INFO] F8> [eos/cdi-jetty-demo:snapshot-161228-115614-0167] "java-exec": Built image sha256:94fad
[INFO] F8> [eos/cdi-jetty-demo:snapshot-161228-115614-0167] "java-exec": Tag with latest
[INFO]
[INFO] --- maven-install-plugin:2.4:install (default-install) @ cdi-jetty-demo ---
[INFO] Installing /home/pim/workspace/cdi-jetty-demo/target/cdi-jetty-demo.jar to /home/pim/.m2/repository/nl/rubix/eos/cdi-jetty-demo/0.0.1-SNAPSHOT/cdi-jetty-demo-0.0.1-SNAPSHOT.jar
[INFO] Installing /home/pim/workspace/cdi-jetty-demo/pom.xml to /home/pim/.m2/repository/nl/rubix/eos/cdi-jetty-demo/0.0.1-SNAPSHOT/cdi-jetty-demo-0.0.1-SNAPSHOT.pom
[INFO] Installing /home/pim/workspace/cdi-jetty-demo/target/classes/META-INF/fabric8/openshift.yml to /home/pim/.m2/repository/nl/rubix/eos/cdi-jetty-demo/0.0.1-SNAPSHOT/cdi-jetty-demo-0.0.1-SNAPSHOT-openshift.yml
[INFO] Installing /home/pim/workspace/cdi-jetty-demo/target/classes/META-INF/fabric8/openshift.json to /home/pim/.m2/repository/nl/rubix/eos/cdi-jetty-demo/0.0.1-SNAPSHOT/cdi-jetty-demo-0.0.1-SNAPSHOT-openshift.json
[INFO] Installing /home/pim/workspace/cdi-jetty-demo/target/classes/META-INF/fabric8/kubernetes.yml to /home/pim/.m2/repository/nl/rubix/eos/cdi-jetty-demo/0.0.1-SNAPSHOT/cdi-jetty-demo-0.0.1-SNAPSHOT-kubernetes.yml
[INFO] Installing /home/pim/workspace/cdi-jetty-demo/target/classes/META-INF/fabric8/kubernetes.json to /home/pim/.m2/repository/nl/rubix/eos/cdi-jetty-demo/0.0.1-SNAPSHOT/cdi-jetty-demo-0.0.1-SNAPSHOT-kubernetes.json
[INFO] ------------------------------------------------------------------------
[INFO] BUILD SUCCESS
[INFO] ------------------------------------------------------------------------
[INFO] Total time: 01:03 min
[INFO] Finished at: 2016-12-28T11:57:15+01:00
[INFO] Final Memory: 61M/873M
[INFO] ------------------------------------------------------------------------

After the project built successfully I wanted to run it in my Kubernetes cluster.

Thankfully the guys at fabric8 also took this into consideration, so by executing the maven goal fabric8:run you app will be booted into a Docker container and louched as a Pod in the Kubernetes cluster just for some local testing.


~/workspace/cdi-jetty-demo$ mvn fabric8:run
[INFO] Scanning for projects...
[INFO]
[INFO] ------------------------------------------------------------------------
[INFO] Building Fabric8 :: Quickstarts :: CDI :: Camel with Jetty as HTTP server 0.0.1-SNAPSHOT
[INFO] ------------------------------------------------------------------------
[INFO]
[INFO] >>> fabric8-maven-plugin:3.1.49:run (default-cli) > install @ cdi-jetty-demo >>>
[INFO]
[INFO] --- maven-resources-plugin:2.6:resources (default-resources) @ cdi-jetty-demo ---
[INFO] Using 'UTF-8' encoding to copy filtered resources.
[INFO] Copying 2 resources
[INFO]
[INFO] --- fabric8-maven-plugin:3.1.49:resource (default) @ cdi-jetty-demo ---
[INFO] F8> Running in Kubernetes mode
[INFO] F8> Running generator java-exec
[INFO] F8> Using resource templates from /home/pim/workspace/cdi-jetty-demo/src/main/fabric8
[WARNING] F8> No .git/config file could be found so cannot annotate kubernetes resources with git commit SHA and branch
[WARNING] F8> No .git/config file could be found so cannot annotate kubernetes resources with git commit SHA and branch
[INFO]
[INFO] --- maven-compiler-plugin:3.3:compile (default-compile) @ cdi-jetty-demo ---
[INFO] Nothing to compile - all classes are up to date
[INFO]
[INFO] --- maven-resources-plugin:2.6:testResources (default-testResources) @ cdi-jetty-demo ---
[INFO] Using 'UTF-8' encoding to copy filtered resources.
[INFO] Copying 1 resource
[INFO]
[INFO] --- maven-compiler-plugin:3.3:testCompile (default-testCompile) @ cdi-jetty-demo ---
[INFO] Nothing to compile - all classes are up to date
[INFO]
[INFO] --- maven-surefire-plugin:2.18.1:test (default-test) @ cdi-jetty-demo ---
[INFO]
[INFO] --- maven-jar-plugin:2.4:jar (default-jar) @ cdi-jetty-demo ---
[INFO] Building jar: /home/pim/workspace/cdi-jetty-demo/target/cdi-jetty-demo.jar
[INFO]
[INFO] >>> fabric8-maven-plugin:3.1.49:build (default) > initialize @ cdi-jetty-demo >>>
[INFO]
[INFO] <<< fabric8-maven-plugin:3.1.49:build (default) < initialize @ cdi-jetty-demo <<<
[INFO]
[INFO] --- fabric8-maven-plugin:3.1.49:build (default) @ cdi-jetty-demo ---
[INFO] F8> Running in Kubernetes mode
[INFO] F8> Running generator java-exec
[INFO] F8> Environment variable from gofabric8 : DOCKER_HOST=tcp://192.168.42.40:2376
[INFO] F8> Environment variable from gofabric8 : DOCKER_CERT_PATH=/home/pim/.minikube/certs
[INFO] Copying files to /home/pim/workspace/cdi-jetty-demo/target/docker/eos/cdi-jetty-demo/snapshot-161228-122841-0217/build/maven
[INFO] Building tar: /home/pim/workspace/cdi-jetty-demo/target/docker/eos/cdi-jetty-demo/snapshot-161228-122841-0217/tmp/docker-build.tar
[INFO] F8> docker-build.tar: Created [eos/cdi-jetty-demo:snapshot-161228-122841-0217] "java-exec" in 5 seconds
[INFO] F8> [eos/cdi-jetty-demo:snapshot-161228-122841-0217] "java-exec": Built image sha256:bccd3
[INFO] F8> [eos/cdi-jetty-demo:snapshot-161228-122841-0217] "java-exec": Tag with latest
[INFO]
[INFO] --- maven-install-plugin:2.4:install (default-install) @ cdi-jetty-demo ---
[INFO] Installing /home/pim/workspace/cdi-jetty-demo/target/cdi-jetty-demo.jar to /home/pim/.m2/repository/nl/rubix/eos/cdi-jetty-demo/0.0.1-SNAPSHOT/cdi-jetty-demo-0.0.1-SNAPSHOT.jar
[INFO] Installing /home/pim/workspace/cdi-jetty-demo/pom.xml to /home/pim/.m2/repository/nl/rubix/eos/cdi-jetty-demo/0.0.1-SNAPSHOT/cdi-jetty-demo-0.0.1-SNAPSHOT.pom
[INFO] Installing /home/pim/workspace/cdi-jetty-demo/target/classes/META-INF/fabric8/openshift.yml to /home/pim/.m2/repository/nl/rubix/eos/cdi-jetty-demo/0.0.1-SNAPSHOT/cdi-jetty-demo-0.0.1-SNAPSHOT-openshift.yml
[INFO] Installing /home/pim/workspace/cdi-jetty-demo/target/classes/META-INF/fabric8/openshift.json to /home/pim/.m2/repository/nl/rubix/eos/cdi-jetty-demo/0.0.1-SNAPSHOT/cdi-jetty-demo-0.0.1-SNAPSHOT-openshift.json
[INFO] Installing /home/pim/workspace/cdi-jetty-demo/target/classes/META-INF/fabric8/kubernetes.yml to /home/pim/.m2/repository/nl/rubix/eos/cdi-jetty-demo/0.0.1-SNAPSHOT/cdi-jetty-demo-0.0.1-SNAPSHOT-kubernetes.yml
[INFO] Installing /home/pim/workspace/cdi-jetty-demo/target/classes/META-INF/fabric8/kubernetes.json to /home/pim/.m2/repository/nl/rubix/eos/cdi-jetty-demo/0.0.1-SNAPSHOT/cdi-jetty-demo-0.0.1-SNAPSHOT-kubernetes.json
[INFO]
[INFO] <<< fabric8-maven-plugin:3.1.49:run (default-cli) < install @ cdi-jetty-demo <<<
[INFO]
[INFO] --- fabric8-maven-plugin:3.1.49:run (default-cli) @ cdi-jetty-demo ---
[INFO] F8> Using Kubernetes at https://192.168.42.40:8443/ in namespace default with manifest /home/pim/workspace/cdi-jetty-demo/target/classes/META-INF/fabric8/kubernetes.yml
[INFO] Using namespace: default
[INFO] Creating a Service from kubernetes.yml namespace default name cdi-jetty-demo
[INFO] Created Service: target/fabric8/applyJson/default/service-cdi-jetty-demo.json
[INFO] Creating a Deployment from kubernetes.yml namespace default name cdi-jetty-demo
[INFO] Created Deployment: target/fabric8/applyJson/default/deployment-cdi-jetty-demo.json
[INFO] hint> Use the command `kubectl get pods -w` to watch your pods start up
[INFO] F8> Watching pods with selector LabelSelector(matchExpressions=[], matchLabels={project=cdi-jetty-demo, provider=fabric8, group=nl.rubix.eos}, additionalProperties={}) waiting for a running pod...
[INFO] New Pod> cdi-jetty-demo-1244207563-s9xn2 status: Pending
[INFO] New Pod> cdi-jetty-demo-1244207563-s9xn2 status: Running
[INFO] New Pod> Tailing log of pod: cdi-jetty-demo-1244207563-s9xn2
[INFO] New Pod> Press Ctrl-C to scale down the app and stop tailing the log
[INFO] New Pod>
[INFO] Pod> exec java -javaagent:/opt/agent-bond/agent-bond.jar=jolokia{{host=0.0.0.0}},jmx_exporter{{9779:/opt/agent-bond/jmx_exporter_config.yml}} -cp .:/app/* org.apache.camel.cdi.Main
[INFO] Pod> I> No access restrictor found, access to any MBean is allowed
[INFO] Pod> Jolokia: Agent started with URL http://172.17.0.6:8778/jolokia/
[INFO] Pod> 2016-12-28 11:28:52.953:INFO:ifasjipjsoejs.Server:jetty-8.y.z-SNAPSHOT
[INFO] Pod> 2016-12-28 11:28:53.001:INFO:ifasjipjsoejs.AbstractConnector:Started SelectChannelConnector@0.0.0.0:9779
[INFO] Pod> 2016-12-28 11:28:53,142 [main           ] INFO  Version                        - WELD-000900: 2.3.3 (Final)
[INFO] Pod> 2016-12-28 11:28:53,412 [main           ] INFO  Bootstrap                      - WELD-000101: Transactional services not available. Injection of @Inject UserTransaction not available. Transactional observers will be invoked synchronously.
[INFO] Pod> 2016-12-28 11:28:53,605 [main           ] INFO  Event                          - WELD-000411: Observer method [BackedAnnotatedMethod] private org.apache.camel.cdi.CdiCamelExtension.processAnnotatedType(@Observes ProcessAnnotatedType<?>) receives events for all annotated types. Consider restricting events using @WithAnnotations or a generic type with bounds.
[INFO] Pod> 2016-12-28 11:28:54,809 [main           ] INFO  DefaultTypeConverter           - Loaded 196 type converters
[INFO] Pod> 2016-12-28 11:28:54,861 [main           ] INFO  CdiCamelExtension              - Camel CDI is starting Camel context [myJettyCamel]
[INFO] Pod> 2016-12-28 11:28:54,863 [main           ] INFO  DefaultCamelContext            - Apache Camel 2.18.1 (CamelContext: myJettyCamel) is starting
[INFO] Pod> 2016-12-28 11:28:54,864 [main           ] INFO  ManagedManagementStrategy      - JMX is enabled
[INFO] Pod> 2016-12-28 11:28:55,030 [main           ] INFO  DefaultRuntimeEndpointRegistry - Runtime endpoint registry is in extended mode gathering usage statistics of all incoming and outgoing endpoints (cache limit: 1000)
[INFO] Pod> 2016-12-28 11:28:55,081 [main           ] INFO  DefaultCamelContext            - StreamCaching is not in use. If using streams then its recommended to enable stream caching. See more details at http://camel.apache.org/stream-caching.html
[INFO] Pod> 2016-12-28 11:28:55,120 [main           ] INFO  log                            - Logging initialized @2850ms
[INFO] Pod> 2016-12-28 11:28:55,170 [main           ] INFO  Server                         - jetty-9.2.19.v20160908
[INFO] Pod> 2016-12-28 11:28:55,199 [main           ] INFO  ContextHandler                 - Started o.e.j.s.ServletContextHandler@28cb9120{/,null,AVAILABLE}
[INFO] Pod> 2016-12-28 11:28:55,206 [main           ] INFO  ServerConnector                - Started ServerConnector@2da1c45f{HTTP/1.1}{0.0.0.0:8080}
[INFO] Pod> 2016-12-28 11:28:55,206 [main           ] INFO  Server                         - Started @2936ms
[INFO] Pod> 2016-12-28 11:28:55,225 [main           ] INFO  DefaultCamelContext            - Route: route1 started and consuming from: jetty:http://0.0.0.0:8080/camel/hello
[INFO] Pod> 2016-12-28 11:28:55,226 [main           ] INFO  DefaultCamelContext            - Total 1 routes, of which 1 are started.
[INFO] Pod> 2016-12-28 11:28:55,228 [main           ] INFO  DefaultCamelContext            - Apache Camel 2.18.1 (CamelContext: myJettyCamel) started in 0.363 seconds
[INFO] Pod> 2016-12-28 11:28:55,238 [main           ] INFO  Bootstrap                      - WELD-ENV-002003: Weld SE container STATIC_INSTANCE initialized
^C[INFO] F8> Stopping the app:
[INFO] F8> Scaling Deployment default/cdi-jetty-demo to replicas: 0
[INFO] Pod> 2016-12-28 11:29:52,307 [Thread-12      ] INFO  MainSupport$HangupInterceptor  - Received hang up - stopping the main instance.
[INFO] Pod> 2016-12-28 11:29:52,313 [Thread-12      ] INFO  CamelContextProducer           - Camel CDI is stopping Camel context [myJettyCamel]
[INFO] Pod> 2016-12-28 11:29:52,313 [Thread-12      ] INFO  DefaultCamelContext            - Apache Camel 2.18.1 (CamelContext: myJettyCamel) is shutting down
[INFO] Pod> 2016-12-28 11:29:52,314 [Thread-12      ] INFO  DefaultShutdownStrategy        - Starting to graceful shutdown 1 routes (timeout 300 seconds)
[INFO] Pod> 2016-12-28 11:29:52,347 [ - ShutdownTask] INFO  ServerConnector                - Stopped ServerConnector@2da1c45f{HTTP/1.1}{0.0.0.0:8080}
[INFO] Pod> 2016-12-28 11:29:52,350 [ - ShutdownTask] INFO  ContextHandler                 - Stopped o.e.j.s.ServletContextHandler@28cb9120{/,null,UNAVAILABLE}
[INFO] Pod> 2016-12-28 11:29:52,353 [ - ShutdownTask] INFO  DefaultShutdownStrategy        - Route: route1 shutdown complete, was consuming from: jetty:http://0.0.0.0:8080/camel/hello

There are two things to note:

thirst the App is not by default exposed outside of the Kubernetes cluster. I will explain how to do this later on in this blog after we have completely deployed the app in our cluster.

Second, the fabric8:run goal starts the container and tails the log in the foreground, whenever you close the app by hitting ctrl+c your app is undeployed in the cluster automatically. To tweak this behavior check: https://maven.fabric8.io

Deploying our microservice in the fabric8 cluster

After running and testing our microservice locally we are ready to fully deploy our microservice in our cluster. For this we also start with a Maven command, mvn fabric8:import will import the application (templates) in the Kubernetes cluster and push the sources of the microservice to the fabric8 git repository based on Gogs.


~/workspace/cdi-jetty-demo$ mvn fabric8:import
[INFO] Scanning for projects...
[INFO]
[INFO] ------------------------------------------------------------------------
[INFO] Building Fabric8 :: Quickstarts :: CDI :: Camel with Jetty as HTTP server 0.0.1-SNAPSHOT
[INFO] ------------------------------------------------------------------------
[INFO]
[INFO] --- fabric8-maven-plugin:3.1.49:import (default-cli) @ cdi-jetty-demo ---
[INFO] F8> Running 1 endpoints of gogs in namespace default
[INFO] F8> Creating Namespace user-secrets-source-minikube with labels: {provider=fabric8, kind=secrets}
Please enter your username for git repo gogs: gogsadmin
Please enter your password/access token for git repo gogs: RedHat$1
[INFO] F8> Creating Secret user-secrets-source-minikube/default-gogs-git
[INFO] F8> Creating ConfigMap fabric8-git-app-secrets in namespace user-secrets-source-minikube
[INFO] F8> git username: gogsadmin password: ******** email: pim@rubix.nl
[INFO] Trusting all SSL certificates
[INFO] Initialised an empty git configuration repo at /home/pim/workspace/cdi-jetty-demo
[INFO] creating git repository client at: http://192.168.42.40:30616
[INFO] Using remoteUrl: http://192.168.42.40:30616/gogsadmin/cdi-jetty-demo.git and remote name origin
[INFO] About to git commit and push to: http://192.168.42.40:30616/gogsadmin/cdi-jetty-demo.git and remote name origin
[INFO] Using UsernamePasswordCredentialsProvider{user: gogsadmin, password length: 8}
[INFO] Creating a BuildConfig for namespace: default project: cdi-jetty-demo
[INFO] F8> You can view the project dashboard at: http://192.168.42.40:30482/workspaces/default/projects/cdi-jetty-demo
[INFO] F8> To configure a CD Pipeline go to: http://192.168.42.40:30482/workspaces/default/projects/cdi-jetty-demo/forge/command/devops-edit
[INFO] ------------------------------------------------------------------------
[INFO] BUILD SUCCESS
[INFO] ------------------------------------------------------------------------
[INFO] Total time: 19.643 s
[INFO] Finished at: 2016-12-28T12:30:27+01:00
[INFO] Final Memory: 26M/494M
[INFO] ------------------------------------------------------------------------

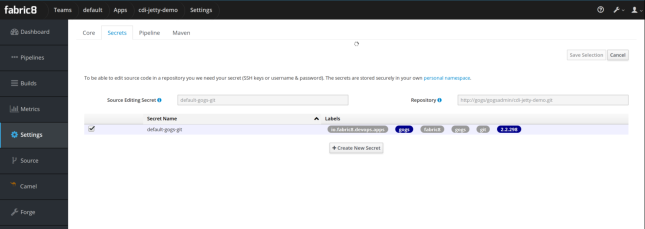
After the successful execution of the import goal we need to finish the setup further in the fabric8 console.

First we need to setup a Kubernetes secret to authenticate to the Gogs Git repository.

select-secret

Next we can select a CD pipeline.

select-pipeline

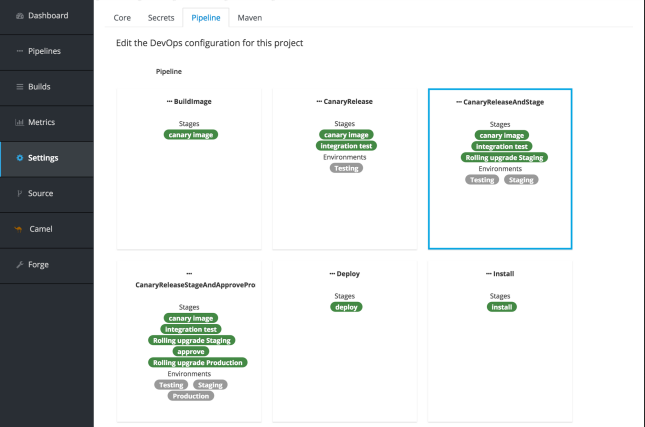
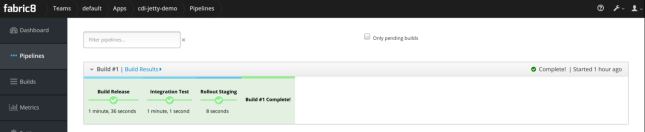
After we have selected a CD pipeline suited for the lifecycle of our Microservice the Jenkinsfile will be committed in Git repository of our microservice. And after that Jenkins will be configured and the Jenkins CD pipeline will start its initial job.

build-success

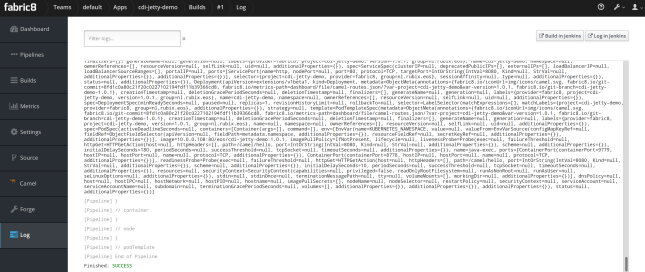
If everything goes fine the entire Jenkins pipeline will finish successfully.

finished-pipeline

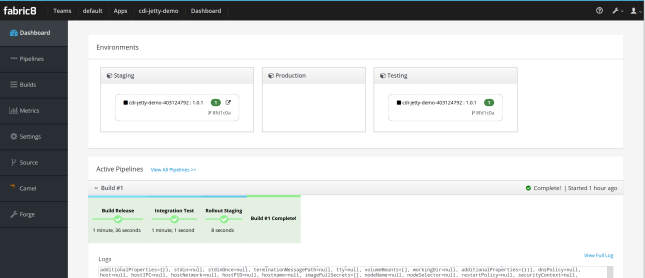
Now our microservice is running in the test and staging environments, which are created if they did not already exist. However like mentioned above the microservice is not yet exposed outside of the Kubernetes cluster. This is because the Kubernetes template used has the following setting in the service configuration:

type: ClusterIP

change this to and your app will be exposed outside of the Kubernetes cluster ready to be consumed by external parties:

type: NodePort

This means the microservice can be called via a browser:

app

If everything went fine the fabric8 dashboard for the app will look something like this:

app-dashboard

Like I mentioned above, the selection of the CD pipeline will add the Jenkinsfile to the Git repository, you can see it (and edit it off course if you whish) in the Gogs Git repo:

gogs-jenkins-file

Some final thoughts

Being able to quickly deploy functionality across different environments and not have to worry about runtime config, app servers, and manually hacking CD pipelines is definitely a major advantage for every app developer. For this reason the fabric8 framework in combination with Kubernetes really has some good potential. Using fabric8 locally with minikube did cause some stability issues, which I have not fully identified yet, but I’m sure this will improve with every new version coming up.

 
1 Comment

Posted by on 2016-12-28 in API Management, Geen categorie


Tags: , , , , , ,

Serverless architecture, what is it?

One of the more recent trends in IT is Serverless architecture. Like any hype in the earlier stages a lot of ambiguity exists on what it is and what problems it solves. Serverless architecture is no different. So recently a collegue of mine Jan van Zoggel (you can read his awesome blog here) and I took a look at what Serverless architecture is.

Some definitions, some ambiguity and some other terms

The Serverless trend emerged, like so many others these days, in the realm of web and app development. Where all logic and state traditionally handled by the backend was placed is a “*aas” (as a service) which got the term BaaS or mBaaS (mobile)Backend as a service.

Meanwhile Serverless also got to mean something slightly different, which of course got another “*aas” acronym, FaaS. Or Function as a Service. In FaaS certain application logic (Functions) run in ephemeral runtimes, in the cloud where the cloud provider in question handles all runtime specific configuration and setup. This includes stuff like networking, loadbalancing, scaling and so on. More on these emphemeral runtimes below.

Even though it is still quite early on in the world of Serverless architectures it seems the FaaS definition of Serverless architecture is gaining more traction than the mBaaS definition. This doesn’t mean mBaaS does not have a valid right of existence, just that it’s association with Serverless architecture is faining away.

To return to the definition of Serverless architecture and FaaS, it seems that the abstraction of (all) runtime configuration, setup and complexity is what Serverless is all about. Off course it is not truly serverless. Your stuff has to run somewhere 😉

With this abstraction in mind I find the definition by Justin Isaf the most to the point when he said:

“Abstracting the server away from the developer. Not removing the server itself”

You can find his presentation about Serverless on YouTube: https://www.youtube.com/watch?v=5-V8DKPsUoU

The evolution of runtimes

When looking not just at Serverless architecture, but also other fairly recent trends in IT, we’re looking at you Cloud, Microservices and Containerization. We can detect a “evolution of runtimes”.

From one to many runtimes.

Traditionally you had one gigantic server, virtualized or bare metal where an application server of some sort was installed to. And on this application server all applications, modules and or components of a system would be deployed to and run. Even though these application servers where usually setup in multiples to at least have some high availability further scaling and moving around these often called monolithic runtimes was hard at best and downright impossible at worst (looking at you mainframe!).

Recently a trend emerged to not only split complex monolithic systems is autonomous modules, called microservices, but also to separate these microservices further by running them in a separate runtime. Usually a container of some sort. Thow in some container orchestration tool like Kubernetes, or Docker Swarm and all of a sudden scaling out and moving around runtimes becomes much much simpler. Every application is neatly separated by others and specific requests or messages for a particular app are handled by its runtime (container).

The next step in this evolution is what Serverless architecture and FaaS is all about. When a container runtime handles all requests of the app it is serving a FaaS function or app runtime handles only one request and turns itself off after the function completes. This turning off after every invocation has a couple of characteristics which defines a Serverless architecture.

  • No “Always on” server – when no invocation requests are being handled and a traditional runtime would be sitting idle a Serverless architecture simply has nothing running.
  • “Infinite” scalability – since every request is handled by it’s seperate runtime and the provisioning and running of these FaaS functions is handled by the (Cloud) provider it provides a theoretically infinitely scalable application.
  • Zero runtime configuration – the configuration of your application server, docker container or server is completely left to the (cloud) provider. Providing a “No-Ops” environment where the team only has to worry about the application logic itself.

evolution-of-runtimes

The evolution of runtimes

You can compare it with modern cars which turn off the engine while waiting for a traffic light. When the light turns green and the engine has to perform it starts. When the car is idling it simply turns off the engine completely.

scalibility

Since every request is handled by its own runtime scalability is handled out of the box.

Commercial offerings

As of the writing of this blog the three largest commercial offerings for implementing a Serverless architecture are available from, not surprisingly, the “big three” of cloud providers.

  1. Amazon AWS Lambda aws-lambda
  2. Google Cloud Functions screen-shot-2016-12-02-at-15-30-58
  3. Microsoft Azure Functions screen-shot-2016-12-10-at-13-06-26

Not suprisingly the specific Serverless offering is completely integrated with all other cloud offerings of the particular provider. Meaning you can invoke your FaaS function from various triggers provided by other cloud solutions.

Some final thoughts

Even though it’s pretty early in the hype cycle Serverless architecture and FaaS definitely have some attractive characteristics. The potential of Serverless functions is very great, basically all short running stateless transactions can be handled by a FaaS functions. And when combined with other cloud offerings like storage and API Gateways even more complex applications can be created with Serverless architecture. With the cloud native and scalability of FaaS your application is completely ready for the 21st century, and off course buzzword complient 😉


Tags: , , , ,

What is HATEOAS?

With probably the most unpronounceable acronym in the world of IT, and there are a lot, HATEOAS is also one of the most obscure and misunderstood constraints of the REST specification. In this article I will make an attempt to shed some light on the world of hypermedia and HATEOAS.

Let’s start with listing the complete list of the constraints of REST to give us some context on where the HATEOAS constraint sits in the REST constraints.

  1. Client-server
  2. Stateless server
  3. Cache
  4. Uniform interface
    1. Identification of resources
    2. Manipulation of resources through representations
    3. Self-descriptive messages
    4. Hypermedia as the engine of application state (HATEOAS)
  5. Layered System
  6. Code-on-Demand


As we just saw in the list of constraints HATEOAS stands for “Hypermedia As The Engine Of Application State”. So, what does this mean?

To grab the concept it’s helpful to think of a regular webpage. When browsing to a page there are, most of the time, various hyperlinks available which you can use to navigate further to other pages. These pages are essentially the “state” of the web(application).

To quote Roy Fielding from his thesis about RESTful architecture and design:

“The name ‘Representational State Transfer’ is intended to evoke an image of how a well-designed Web application behaves: a network of web pages (a virtual state-machine), where the user progresses through the application by selecting links (state transitions), resulting in the next page (representing the next state of the application) being transferred to the user and rendered for their use.”-Roy Fielding
Architectural Styles and the Design of Network-based Software Architectures
Chapter 6

So in essence the states are the various webpages and the transitions to the different states are the hyperlinks. The hyperlinks are the “engine” to which the state transfer can occur.

Hateoas_web

Above we see a diagram of various webpages, when starting to browse the internet we start at an initial starting page. Clicking links on this starting page we can browse to other pages. Except from changing the URL manually in the browser address bar, the pages we can open via hyperlinks are dictated by the first page itself. The state transitions are controlled by the web application. This is an important concept in HATEOAS as well. Also the endpoints are hidden from an end user perspective.

As stated above the webpages are states of the (web)application and the hyperlinks are the mechanism (engine) to changing the state. We can abstract our webpages diagram also to this:

Hateoas_api

So… how does this applies to REST and HATEOAS?

The way to implement HATEOAS is pretty straightforward: in each response message add the link(s) for possible next request messages. Therefore give the opportunity to the consumer of the REST service to transition the state via the links in the response message.

A very simplified example of a HATEOAS response:

{
  "stocklist": {
    "name": "ACME",
    "price": "10.00",
    "link": [
      {
        "rel": "self",
        "href": "/stock/ACME",
        "method": "get"
      },
      {
        "rel": "buy",
        "href": "/account/ACME/buy",
        "method": "post"
      },
      {
        "rel": "sell",
        "href": "/account/ACME/sell",
        "method": "post"
      }
    ]
  }
}

In our simple example response we request the stock information for ACME. We get the price back, but in addition the links to either buy or sell the stock.

So when we add links to our responses does that mean we are now truly RESTfull?

Again, Roy Fielding seems pretty clear about this:

“If the engine of application state (and hence the API) is not being driven by hypertext, then it cannot be RESTful and cannot be a REST API. Period. Is there some broker manual somewhere that needs to be fixed?”-Roy Fielding
REST APIs must be hypertext-driven
Untangled: Musings of Roy T. Fielding

But, are we truly RESTful if we include hyperlinks in our responses?

The thing is, people do not use REST API’s. People use apps and sites and those apps and site use those REST API’s. So what does this mean? It means that if the app or site developer chooses not to use the HATEOAS links in the response the end user cannot state transition using hypermedia and ergo we are not truly HATEOAS compliant and thus RESTful.

So, adding the links in the responses is an important step in HATEOAS and RESTful compliant, it is only the first step.

HATEOAS is one of the more misunderstood and forgotten REST constraints. I hope this blogpost will help you in better grasp this REST constraint.

 
Leave a comment

Posted by on 2016-03-18 in API Management


Tags: , , , , , ,